Showing posts with label Tutorial Tuesday. Show all posts

Thursday, September 16, 2010

Roasting a Pie Pumpkin

Here is the final product from my surprise plant that our neighborhood squirrel hid in our front flower bed. Hey, the squirrel may have destroyed my son's favorite little pumpkin in 2009, but he definitely made up for it in 2010!

Since our pumpkin ripened a little bit early, I decided to go ahead and bake it, rather than parking it on the porch for another squirrel to devour! Plus I have always wanted to try to make pumpkin chocolate chip muffins (miniature, of course) and I've heard that the pumpkin shortage of 2009 is lingering into 2010- so what better time to try my hand at pumpkin roasting!

First I washed our pumpkin and cut it in half.

Next, I scooped out the seeds and inner membranes- just like caring for ol' Jack!

And since I'm already aware that growing pumpkins are fun and rewarding, I saved a few seeds to drop into my garden next year!

I removed the stem, and placed the flesh sides down on a cookie sheet lined with foil. Bake at 375* for 1.5 hours.

The scent is amazing! This is what the pumpkin looked like coming out of the oven!

Beautifully baked!

The pumpkin flesh scoops from the pumpkin skin so easily!!!

Seriously, every last bit of pumpkin flesh is yours for the baking!!!

Lastly, I pureed the pumpkin,

and packed it (pre-measured for my muffin recipe, of course) in freezable portions for ready to bake goodness!

Note: My average sized pumpkin yielded 4 cups of pumpkin puree, about 1/2 a cup more than a traditional sized can of pumpkin puree.

I also picked up a couple of pie pumpkins at the local farmer's market for $1 each. I have also seen them at the local grocery store for $2 each!


Whatd'ya think? Will YOU roast your own pie pumpkin this year?

Tuesday, July 20, 2010

Tutorial Tuesday: Olive Garden Dressing Knock Off

Yes, its true... I'm a salad junkie (especially with garden fresh veggies)! And although I normally stick with my favorite homemade Italian dressing, when I read this recipe (from tammysrecipes.com) I knew it needed to be tried!

Ingredients: mayo (1/2 c), white vinegar (1/3 c), vegetable oil (1 T), corn syrup (2 T), Parmesan/Romano cheese (4 T), garlic salt (1/2 t), Italian seasonings (1/2 t) and lemon juice (1 T)

I was happy that I happened to have all of the recipe ingredients on hand... I had just purchased the corn syrup to make bubbles with (should I post that too?)! And I love that all I had to do to create this recipe was pour the ingredients into my blender, whirrr for a minute and then pour over my salad! YUM!

I was kind of expecting more of a clear looking dressing (similar to the Olive Garden itself), but I was pleasantly surprised by the taste... it has a little zip to it!

Just look at those home grown tomatoes coated in that delicious looking dressing... YUM!

How about YOU, do YOU have a great summer dressing recipe to share?

Tuesday, July 13, 2010

Tutorial Tuesday: Dipping Oil

OK, I must confess... I can be a bit judgy! I'm a pretty tough critic when it comes to Italian restaurants and the dipping oil that they serve!!! No, I'm not Italian by genetics, but I'm Italian by amore... amore for bread and dipping oil!

You see, I'm hostessing a party in a couple of weeks, and I NEED to have a delicious dipping oil to compliment the rest of the meal that I'm planning to serve... and you know, desire is the Mother of Invention... or something like that!

OK, in hopes of creating THE BEST dipping oil EVER, I combined my favorite flavors from Bella Notte (in Lexington KY), Johnny Carino's and a few ideas from scouring the web... enjoy!

Ingredients: garlic, good olive oil, rosemary, oregano, basil, red pepper flakes, salt, pepper and Parmesan cheese!

In order to incorporate the "Johnny Carino's" type of garlic feel, I peeled, and finely chopped two heads of garlic. (You could make much less, but I figure make a batch and freeze the extra's for later!)
I placed about a quarter size dollop of olive oil in my pan, coated the garlic well, and then consistently stirred over medium heat for 10ish minutes! Its important to constantly stir so your garlic won't burn!

Combine all of the most yummy Italian flavors: 1T toasted garlic, 1T rosemary, 1T oregano, 2t basil, 1/2t red pepper flakes, 1/2t salt, 1/2t pepper and 3T Parmesan cheese.

The mixture is beautiful! Store in the freezer in an air tight container when not noshing with fresh bread!

Mmmm! Beautiful drizzled with olive oil!

Dip. Enjoy. Repeat!

Tuesday, June 22, 2010

Tutorial Tuesday: Pulled Pork

How is it that I just discovered how DELICIOUS pulled pork is? Now I scope out the pork section while grocery shopping!

Ingredients: pork, BBQ sauce and water.

Begin by placing your pork in your crock pot. I had to slice mine in half, which isn't fun, but is totally worth it!!!

Drizzle the entire bottle of BBQ sauce and add half a cup of water to the crock pot! Cook on low for 6-8 hours, your house will smell amazing!

After the 6-8 hours, remove your pork from the crock pot, remove the gobbly-gook (that's technical jargon for fat marbling on your meat), and shred. Go ahead and taste test a little bite... heck, take a little taste test in my honor as well!

Lastly, either add a little bit of the liquid left in your crock pot to the shredded meat, or add more fresh BBQ sauce- and enjoy!

My husband likes to eat his pulled pork sandwiches with a little cole slaw on top, but I'm more of a plain Jane.

Any pulled pork fans out there?

Tuesday, June 15, 2010

Tutorial Tuesday: Summer Squash

Summer Squash is darn near becoming one of my all time favorite vegetables!

I don't remember eating Summer Squash growing up, although we did eat a lot of other varieties of squash! My love affair with this simple to prepare and yummy to consume little, yellow vegetable began after my husband Dave and I were married!

I learned to make Summer Squash from my mother-in-law (thanks Mom!), who learned to make it from her mother-in-law (thanks Grandma!)! The recipe is quick, simple, forgiving, healthy, delicious--- and super inexpensive!

Ingredients: Summer Squash (at least a pound), butter, water and salt.

Begin with clean squash, and then begin slicing each vegetable into quarter inch thick slices.

Here, I've sliced about three pounds! I LOVE that Summer Squash sells for about $1/pound, which makes this an easily affordable side dish!

Add about 1/3 cup - 1/2 cup of water per pound of sliced squash.

Then, according to the poundage of your squash, add a few pats of butter. I added a little less than a quarter of a stick of butter for these three pounds. The butter taste should not be overwhelming, its more of just a hint!

Over low-medium heat, allow the squash slices to heat thoroughly and become translucent! In our family, I get the squash prepped and on the stove, and then my husband will go outside and start grilling dinner. This recipe for Summer Squash is kind of a 'start, walk away, forget about... remember and then enjoy' kind of side dish! The squash will be perfectly tender when dinner is done grilling!

Usually, I will add a dash of salt to the Summer Squash after it is done cooking! Mmm! I can't wait for my squash plants to start producing!

Do YOU eat Summer Squash? Does this recipe sound tempting to YOU?

Tuesday, June 8, 2010

Tutorial Tuesday: Fresh Cherry Sauce

So... I have this thing with cherries! I think they are one of the most tasty (and most adorable) fruits! I occasionally get a hankerin' for cherry pie, cherry crisp (I'm salivating!), dried cherries in my salad- heck, even a Cherry Coke! Mmm, I'm suddenly very thirsty!

With Meijer's great deal of cherries this week, I decided to try my hand at home made cherry sauce! (Recipe courtesy of Cooks.com)

Ingredients: Cherries, sugar, cornstarch- (don't worry, its just a thickener for the sauce, you won't even taste it!) and water!

Begin by washing your cherries! Feel free to admire their beauty!

Alright, enough gazing, lets get to work!

During my cherry research, I stumbled across the idea of using a paperclip to de-pit the cherries- you know how I have a special spot in my heart for paperclips (never leave home without them- attached to coupons of course!), so I decided to give the idea a shot!

The idea did work, but it was slow-as-molasses (and I was wishing that I had picked up a cherry pitter) so I used the edge of a baby type of spoon, and it was much faster!

NOTE: OK, you must know that the cherries really will stain your hands- so either wear rubber gloves or bribe someone else to pit for you!

After all of your cherries have been de-pitted, they will look like this!

Add your cherries to a sauce pan and add the sugar, salt and water.

Bring the mixture to a boil, and then simmer for 5-8 minutes. This smells delicious!

Then add a tablespoon of cornstarch to a tablespoon of water.

My mother-in-law taught me to use a little lidded jar when combining powders and liquids- you shake, shake, shake and you're well mixed!

Add the cornstarch to the cherries and cook for 2-3 more minutes.

Viola! Delicioso!

I actually ate this bite- I'm not bragging, but merely stating the fact that I was the resident taste tester for this recipe! It passed! YUMM-O!


OK, so what to do with cherry sauce?

1. Pour over ice cream! I actually pureed a little bit and I plan to add it to some home made ice cream (more on that in a later post!).

2. Make a cherry crisp!

3. Cheesecake topping- if you like that sort of thing!

4. Pudding additive.

5. Add the cherry juice to chicken marinating with Teriyaki sauce, grill, and top chicken with cherry pieces!

Recipe Recap:
1 quart of fresh cherries. That's about 4 cups of whole berries.
1/2 cup of sugar
1/2 cup of water
1/3 teaspoon of salt
1 tablespoon of cornstarch
1 tablespoon of water

Thursday, May 27, 2010

Thought Provoking Thursday

I smiled this morning when I read Bargains to Bounty's post listing almost two dozen salad recipes... great minds think alike!

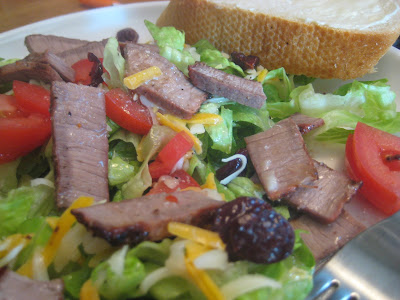
This picture shares our family's Monday night dinner; steak salad and yummy bread. Quick, easy, delicious, seasonal, a crowd pleaser and inexpensive. What more could a wife/mother ask for?

We've eaten this meal several times already, and it may well become a 'grillin' season' staple for our family! Lettuce and salad additives (like tomatoes and cucumbers) are plentiful, freshly picked and at their lowest prices of the year! The steak that I have been purchasing, sells for about $2.59/pound, and we are able to feed our family of three with less than one pound. Our size steaks usually sell for about $2! The best parts of these thin little steaks are that they are very lean, are versatile to prepare (marinade or seasonings), are grilled quickly and taste delicious in a salad!

Have YOU considered instituting any inexpensive & seasonal 'Summer staples' into YOUR meal planning?

____________________________________________________


Lastly, I thought I'd share my easy, inexpensive and yummy Italian pasta salad!

Begin by boiling your favorite pasta, we enjoy Piccolini.

Next, slice a few rounds of cucumber, and slice them into match stick size slices.

Next, quarter your cherry/grape tomatoes.

I like to dice mozzarella cheese into cute little squares (can you tell that presentation is everything in my book?).

Lastly, assemble your ingredients and add the Italian dressing! (For the best results (wink, wink, wink!) try my homemade salad dressing!)

Beautiful and tasty, the best combination!